How to Make a Works Cited Page Perfectly

Creating a works cited page boils down to a few key actions: you gather the author, title, and publication details for every source, format each entry according to a specific style like MLA, and then organize them alphabetically on their own page. It’s more than just a list—it's how you give credit, validate your research, and show readers how to find your sources.
The Building Blocks of a Strong Works Cited Page

Before you even start typing up your citations, it helps to understand why you're doing it. Trust me, it makes the whole process feel less like a chore. A works cited page isn't just academic busywork; it's the very foundation of your credibility. It gives your readers a clear trail, showing them exactly where your information came from and proving your arguments are built on solid ground.
I like to think of it as building with LEGOs. Each piece of information—the author's name, the article title, the publisher, the date—is a single block. When you assemble them in the right order for your specific style (like MLA, APA, or Chicago), you create a sturdy, reliable structure.
The Core Components of Any Citation
At its core, every citation, no matter the style, is trying to answer a few simple questions for your reader. Think of it as creating a clear road map back to the original source. You'll almost always need to hunt down these key pieces of information.
The table below breaks down these essential components. Nailing these down early will save you a massive headache later.
| Component | What It Is | Why It's Important |
|---|---|---|
| Who | The author, artist, or organization that created the work. | Gives credit to the creator and establishes their authority on the subject. |
| What | The title of the specific work (e.g., article, book chapter, video). | Identifies the exact piece of content you're referencing. |
| Where | The larger container of the work (e.g., book title, journal name, website). | Helps your reader locate the source within a larger publication or platform. |
| When | The date the work was published, posted, or last updated. | Puts the source in a historical context and shows its timeliness. |
| Publisher | The company or organization responsible for making the work available. | Adds a layer of credibility and helps in locating the source, especially for books. |
| Location | The URL, DOI (Digital Object Identifier), or page numbers. | Provides the direct "address" for your reader to find the source themselves. |
Gathering this information as you go is a game-changer. It means you won't be scrambling to find a missing URL or a publication date right before your deadline.
Why This Framework Matters
By making it a habit to grab these fundamental details for every source while you're doing your research, you completely sidestep that last-minute panic. This proactive approach turns what can be a confusing task into a simple, almost mechanical process. It's also a key step in ensuring your academic work is sound, a principle that’s vital when you’re looking for things like TAFE and university assignment help.
The focus on proper citation has become incredibly important. In fact, some studies show that around 70% of academics see accurate citation as absolutely critical for establishing credibility in research.
This framework also helps you maintain an authentic voice. When your sources are handled correctly, your own ideas can shine through more clearly. For anyone concerned about their work's originality, our guide on how to avoid AI detection in writing offers some great tips for making sure your final paper is 100% yours.
How to Gather Your Source Information Correctly
The real secret to building a works cited page without that last-minute, deadline-fueled panic? It's all about gathering the right information from the very start.
Think of yourself as a detective. As you research, you’re collecting clues for every single source. This simple habit saves you from that frantic, caffeine-fueled scramble for a missing publication date an hour before your paper is due. We’ve all been there, and it’s not fun.
For every source you even think you might use—whether it’s a dusty textbook, a blog post, or a TikTok video—carve out a dedicated space in your notes to jot down its details.
What to Grab for Any Source
To make your life infinitely easier down the road, I recommend a simple checklist for each source. This ensures you have everything you need when it's time to actually build the citation entry.
- Who created it? Look for the author's full name. If there isn't one, grab the organization's name or even a username.
- What is it called? This is the specific title of the article, video, or book chapter you're looking at.
- Where was it published? Note the name of the website, the journal it appeared in, or the title of the larger book it's a part of.
- When was it published? Pinpoint the most specific date you can find—day, month, and year if possible.
- Who published it? Identify the publisher or the sponsoring organization behind the work.
- How can someone else find it? This is crucial. Copy the full URL or DOI (Digital Object Identifier) and make a note of any page numbers.
This might feel like a bit of extra work up front, but trust me, it transforms the dreaded task of creating a works cited page into a simple assembly job later on.
A common hurdle I see is trying to cite a source with missing information, like a blog post with no author or a video without a clear publication date. The key is to document what you can find. For example, if there's no author, your MLA citation will simply start with the title of the work instead.
Once you have all this information logged, formatting it correctly is the final piece of the puzzle. While gathering the details is a manual effort, you still want to ensure the final output is polished. It's always a good idea to run a final check after you've compiled everything. If you're curious about using tech for a final polish, you can explore the pros and cons of AI proofreading in our guide on whether AI can proofread an essay. This can be a great way to catch those tiny errors your own eyes might glaze over.
How to Cite Common Sources in MLA Format
Alright, let's get into the nitty-gritty of building a works cited page. The core parts of a citation are pretty consistent, but how you arrange them depends entirely on what kind of source you're using. We'll be focusing on the MLA 9th edition rules for the most common sources you'll probably run into.
The whole process is a lot less intimidating when you have a clear workflow. This visual really breaks it down from the research phase to your final, polished list.
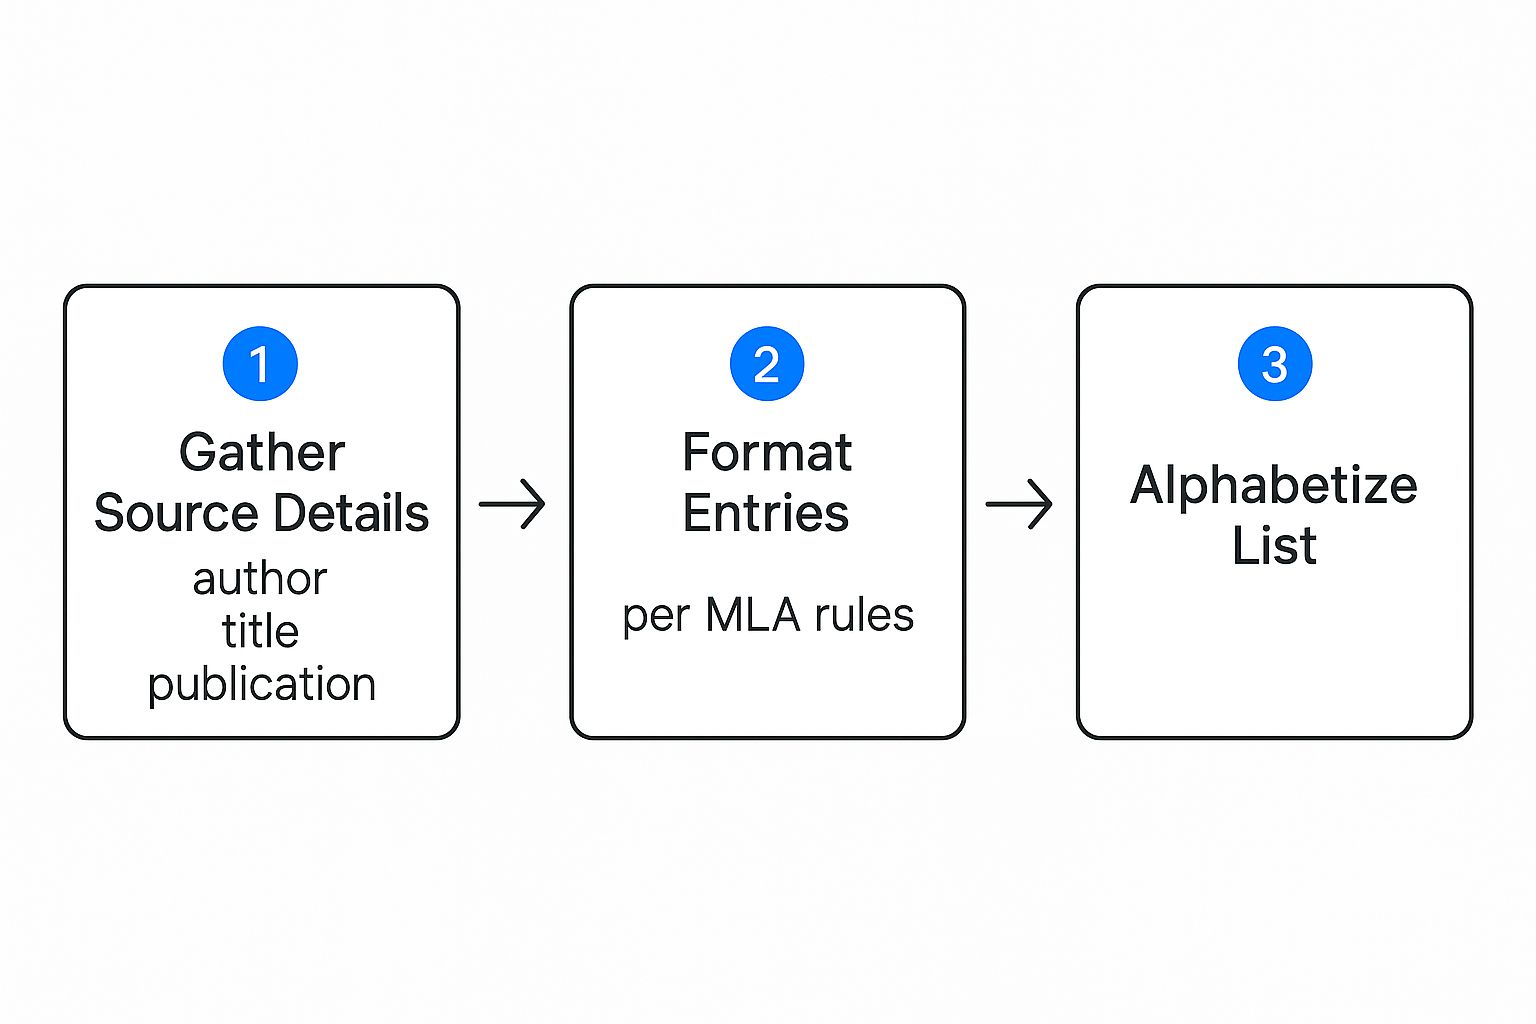
As you can see, it’s all about being methodical. You gather the details for each source as you find it, format the entry correctly, and then alphabetize everything at the end. Simple.
Citing a Book and a Website
Books and websites are the bread and butter of most academic papers. While they both need an author and title, the citation format has a few key differences to reflect how they're published.
For a Book:
- Format: Last Name, First Name. Title of Book. Publisher, Year of Publication.
- In Action: Gladwell, Malcolm. Outliers: The Story of Success. Little, Brown and Company, 2008.
For a Website Article:
- Format: Author's Last Name, First Name. "Title of the Article." Name of Website, Day Month Year, URL.
- In Action: Lee, Kevin. "The Science of Stronger Teams: A Guide for Managers." Buffer Blog, 15 July 2021, buffer.com/resources/science-of-stronger-teams/.
The biggest difference? For a website, the article title goes in quotes, the website's name is italicized, and you always include the full URL.
Citing a Journal Article and Statistics
Academic journal articles, especially those you pull from a database, need a bit more information so your reader can track them down. And when it comes to statistics, citing them correctly isn't just a suggestion—it's essential for your credibility.
This example highlights the "container" system in MLA, where you list details from the smallest container (the article itself) all the way to the largest (the database where you found it).
For a Journal Article from a Database:
- Format: Author's Last Name, First Name. "Title of Article." Title of Journal, vol. #, no. #, Publication Date, pp. #-#. Name of Database, DOI or URL.
- In Action: Ahmed, Sara. "A Phenomenology of Whiteness." Feminist Theory, vol. 8, no. 2, Aug. 2007, pp. 149-68. SAGE Journals, doi:10.1177/1464700107078131.
I can't stress this enough: you have to cite your statistics. A number like "50% of marriages end in divorce" might feel like something everyone just knows, but it came from somewhere. Backing up your data with a proper source is fundamental to making a strong, persuasive argument.
Getting these common formats down will give you a solid foundation. In an age where AI writing tools are becoming more popular, a perfectly cited works cited page is a clear signal of your own academic diligence. For more on this, check out our piece on whether students can tell if you used ChatGPT, which dives into the nuances of using AI in academic work.
Formatting Your Page for a Professional Look
The content of your citations is obviously the most important part, but don't underestimate how you present them. A clean, correctly formatted page signals to your instructor that you’re serious about the details. It's the professional polish on all your hard research.
First things first: your works cited page always gets its own, separate page at the very end of your paper. Just like the rest of your essay, the entire page needs to be double-spaced. Use a standard, readable 12-point font like Times New Roman, and make sure your margins are set to 1 inch on all sides.
At the very top of the page, you'll center the title: Works Cited. That's it. No bolding, no italics, no underlining—just a simple, clean header.
Mastering the Hanging Indent
The single most recognizable formatting trick on a works cited page is the hanging indent. This is where the first line of each citation starts at the far left margin, but any lines after that are indented by 0.5 inches. It's a small detail, but it makes the list incredibly easy for a reader to scan because each author's last name pops right out.
Getting this set up is pretty simple in most word processors.
- In Microsoft Word: Just highlight your citations, open the "Paragraph" settings box, and look for the "Special" dropdown menu under "Indentation." Choose "Hanging."
- In Google Docs: Highlight your text, then go to "Format" > "Align & indent" > "Indentation options." From there, you can select "Hanging" under the "Special indent" option.
A correctly alphabetized list with a hanging indent is the hallmark of a well-executed works cited page. It's what ties your in-text citations back to your sources, creating a seamless and easy-to-follow map of your research.
Finally, always alphabetize your entries by the author's last name. If a source doesn’t have an author, you’ll alphabetize it by the first major word of the title (so, ignore words like "A," "An," or "The"). The whole point is to make it effortless for your reader to navigate. And if you used any AI tools to help with your research or drafting, it’s a good idea to learn how to convert AI-generated text to human text to ensure your final paper is polished and reflects your own voice.
While this guide dives deep into MLA, it's certainly not the only game in town. Depending on your major or the specific class you're in, you might find yourself needing to master a completely different set of citation rules.
It helps to think of citation styles like regional dialects. They all communicate the same core information—author, title, publication details—but they do it with different accents and grammar. The two other giants you'll most likely run into are the American Psychological Association (APA) and Chicago styles. Getting a handle on their main quirks now will make you a far more adaptable writer down the road.
APA and its Focus on Timeliness
If you're writing for the social sciences—think psychology, business, or education—you're almost guaranteed to use APA style. Its single biggest tell is the massive emphasis it places on the date of publication.
Unlike MLA, where the date is tucked away near the end of the citation, APA shoves the year in parentheses right after the author's name.
- APA Example: Smith, J. D. (2020). The science of habits. University Press.
It seems like a tiny change, but it has a huge impact. It immediately signals to your reader how current the research is, which is a massive deal in fast-moving scientific fields. You'll also notice APA calls its final page a "References" page, not "Works Cited."
Globally, citation styles like MLA and APA have become the standard for academic writing, with millions of students and researchers relying on them. The MLA 9th edition, for example, gives specific guidance for today's digital sources, like putting article titles in quotes and always including a URL if one is available. You can learn more about how MLA handles electronic sources from the experts at Purdue OWL.
Chicago Style and Its Two Systems
Chicago is a bit of a chameleon, popping up most often in history and other humanities fields. It can be tricky at first because it actually gives you two completely different systems to choose from.
- Notes and Bibliography: This is the one you'll see most often in history books. It uses footnotes or endnotes for citations right in the text, which then point to a full bibliography at the end. It’s fantastic for citing all sorts of unique or obscure sources.
- Author-Date: This system feels much more like APA. It uses parenthetical in-text citations that refer to a final reference list.
The biggest giveaway for Chicago is seeing those tiny superscript numbers at the end of sentences. If you spot those, you're almost certainly looking at the notes and bibliography system. Just being able to recognize these fundamental differences is the first step to mastering whatever citation style gets thrown your way.
Got Questions About Your Works Cited Page? We've Got Answers.

Even after you think you’ve got the hang of citations, a few tricky situations always seem to pop up. Let's walk through some of the most common sticking points I see students and writers struggle with.
One of the first hurdles is understanding the difference between a "works cited" page and a "bibliography." They sound interchangeable, but they're not.
A works cited page, the standard for MLA style, is a list of only the sources you actually quote or paraphrase in your paper. On the other hand, a bibliography is much broader. It can include every single source you looked at during your research, even the ones you didn't end up using in your final draft. Always double-check which one your professor or publication wants.
What to Do When Information Is Missing
It happens to everyone. You find the perfect source, but there's no author listed, or you can't pin down a publication date. Don't worry; the style guides have a plan for this.
- No Author: If a source doesn't have a credited author, your citation entry simply starts with the title of the work. When you alphabetize your list, you'll use the first main word of that title (ignoring words like "A," "An," or "The").
- No Date: Can't find a publication date anywhere? The standard move is to use the abbreviation "n.d." which just means "no date."
The goal is always to give your reader as much information as you possibly can. Being honest and transparent in your citations is what matters most.
I always tell people that online citation generators are helpful, but they aren't perfect. Tools like EasyBib can give you a great starting point, but they sometimes slip up on punctuation or formatting details. You absolutely have to check their output against an official style guide, like the one from Purdue OWL.
How to Order Your Entries
Finally, how do you actually arrange everything on the page? It's pretty straightforward: alphabetize the entire list entry by entry, using the author's last name.
If you have a source without an author, you'll alphabetize it by its title. Just remember to ignore any initial articles like "A," "An," or "The." So, an article titled "An Analysis of Modern Art" would be filed under A for "Analysis." And one last thing—never number the entries in your list.
Nailing your works cited page is all about precision and detail. For every other part of your writing journey—from humanizing AI drafts to making sure your work is 100% original—Word Spinner has you covered. Our all-in-one platform helps you rewrite, generate, and polish your content with ease, featuring built-in citation tools and an AI detector to keep your academic work authentic. Try it free at word-spinner.com.